
You install a new bearing in a washing machine. Three weeks later, it is seized with rust. That is a costly surprise.
Ordinary pillow block bearings fail fast in industrial laundry equipment because of constant water, high heat, aggressive detergents, and heavy vibration. You need special corrosion-resistant materials, high-temperature seals, and the right lubrication to survive.
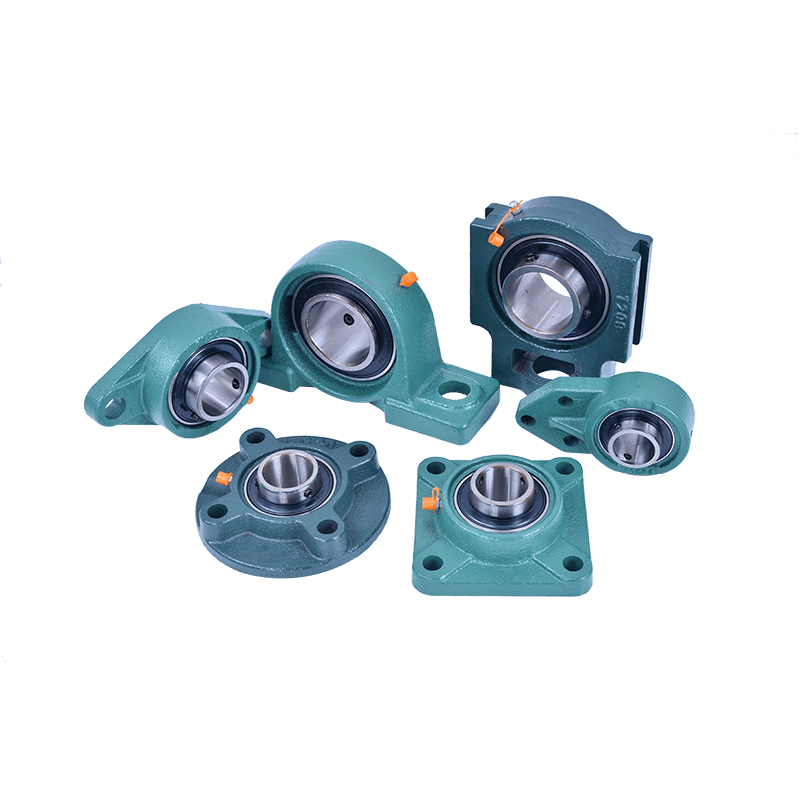
I run a bearing factory in China. Our brand is FYTZ Bearing. I have supplied bearings to laundry equipment makers in Turkey, Brazil, and India. One customer in Mumbai – a distributor named Rajesh – told me his clients were replacing bearings every two months. The machines ran 16 hours a day. Water and detergent got into every bearing. So I decided to write this post. I will explain why laundry machines kill ordinary bearings. Then I will show you what materials, coatings, seals, and re-greasing schedules actually work. These tips come from real field tests and factory data. Let us dive in.
Why Do Industrial Laundry Machines Destroy Ordinary Pillow Block Bearings So Fast?
You think a bearing is a bearing. Then you put one in a washer extractor. It fails in weeks. What is so special about laundry equipment?
Industrial laundry machines destroy ordinary bearings because they combine four killers: constant water exposure, high temperatures (up to 90°C), aggressive chemicals (chlorine and caustic soda), and heavy unbalanced loads that cause vibration and shock.
Let me break down each killer so you understand the real problem.
I have visited many industrial laundries. The conditions are brutal. A hotel laundry runs 24/7. A hospital laundry uses strong disinfectants. A denim processing plant has abrasive indigo dust. Ordinary bearings made for factories or conveyors do not last here.
Killer 1: Water intrusion
Water is the number one enemy of any steel bearing. Standard bearing steel (52100 chrome steel) starts to rust in minutes when wet. Rust flakes off the raceway. The flakes act like sand. They grind the rolling elements. Soon the bearing gets noisy. Then it seizes. In a washing machine, water sprays everywhere. Steam fills the air. Even a sealed bearing can let water in if the seals are not designed for wet conditions. I have seen bearings fail in one week because the housing had a tiny gap.
Killer 2: High heat
Industrial dryers and washer extractors run hot. Temperatures can reach 80°C to 90°C inside the machine. Ordinary bearing grease starts to thin out above 70°C. The grease runs off the metal surfaces. Then the bearing runs dry. Dry metal on metal creates more heat. The heat can also damage rubber seals. They become hard and crack. Once the seals crack, water and detergent get in easily. So you need bearings rated for at least 120°C for laundry use.
Killer 3: Aggressive chemicals
Laundry detergents are not gentle. They contain surfactants, enzymes, and builders. Many industrial laundries also use chlorine bleach or hydrogen peroxide. These chemicals attack standard bearing grease. They break down the thickener. The grease turns into a watery sludge. The same chemicals can also corrode the bearing housing. Cast iron housings with standard paint will peel and rust. Even stainless steel can pit if the chlorine concentration is high.
Killer 4: Vibration and shock loads
A washing machine drum spins at high speed. But the load is never perfectly balanced. Wet sheets and towels clump together. The drum shakes. That vibration transfers to the pillow block bearings. The bearings see sudden shock loads. These shock loads can dent the raceways. This is called brinelling. Once dented, the bearing makes a thumping noise. Then it fails. Ordinary bearings are not built for this kind of abuse.
Here is a simple table to show the difference.
| Condition | Ordinary bearing | Laundry-grade bearing |
|---|---|---|
| Water exposure | Light splash | Continuous spray, steam |
| Max temperature | 70°C safe | 100°C+ safe |
| Chemical resistance | Poor (standard grease) | Excellent (special grease) |
| Vibration tolerance | Low | High (caged rollers, tight clearances) |
So if you run a laundry or fabric processing line, do not buy standard bearings. You will waste money on replacements and downtime. Instead, you need bearings built for this environment. Let me show you what materials work.
What Bearing Materials and Coatings Can Survive Constant Water and Detergents?
You see rust on the housing. The bearing feels rough when you turn it. You need materials that do not corrode.
For constant water and detergents, choose AISI 440C stainless steel bearing inserts with a glass-filled nylon or stainless steel housing. For lower budgets, use chrome steel with a zinc phosphate coating plus a food-grade epoxy paint on the housing.
Let me compare the material options so you can pick the right one for your budget and conditions.
I have supplied bearings to laundry equipment manufacturers in Vietnam and Indonesia. They all ask the same question: stainless steel or coated steel? The answer depends on your chemical mix and how much you want to spend.
Option 1: Full stainless steel (AISI 440C or SUS440C)
This is the best choice for wet and chemical-heavy environments. The bearing rings, balls, and cage are all stainless steel. They do not rust. They resist chlorine and caustic soda. The housing can also be stainless steel or a high-grade polymer. The downside is cost. A stainless steel pillow block bearing costs three to five times more than a standard one. But in a hospital laundry that runs 24/7, the longer life pays back fast. I have a customer in Brazil who switched to full stainless bearings. His replacement interval went from 2 months to 18 months. That saved him thousands of dollars in downtime.
Option 2: Chrome steel with protective coating
If full stainless is too expensive, you can use standard 52100 chrome steel with a coating. The most common coating is zinc phosphate. It gives a dull gray finish. The coating resists rust for a while. But if it scratches, the bare steel underneath will rust. So this is only for light moisture. For laundry use, I recommend a combination: zinc phosphate on the bearing plus a thick epoxy paint on the housing. The epoxy paint is harder than standard paint. It does not peel in hot water. Many of my customers in Turkey use this for their dryer bearings. It works well as long as they re-grease often.
Option 3: Glass-filled nylon (polymer) housing
The housing does not have to be metal. Polymer housings are corrosion-proof. They are also lighter and absorb vibration better than cast iron. The bearing insert inside is still steel (usually stainless). But the housing never rusts. Polymer housings are common in food and laundry equipment. The downside is that they cannot handle very high temperatures (above 110°C) or heavy shock loads. For a standard washer extractor running at 80°C, polymer is fine. For a steam-heated dryer, stick with stainless steel.
Option 4: Special coatings for extreme chemicals
Some laundries use peracetic acid or high-concentration chlorine. These chemicals attack even 440C stainless steel over time. For those conditions, you need a bearing with a ceramic coating on the rings and balls. This is very expensive. Only a few factories make them. At FYTZ, we can customize bearings with a tungsten carbide coating. It is almost indestructible. But you only need this if your laundry processes medical textiles or uses very aggressive disinfectants.
Here is a material selection table.
| Material combination | Corrosion resistance | Max temperature | Cost level | Best for |
|---|---|---|---|---|
| Chrome steel + painted cast iron | Low | 70°C | $ | Dry fabric handling only |
| Chrome steel + zinc phosphate + epoxy housing | Medium | 80°C | $$ | Light moisture, occasional wash |
| AISI 440C stainless insert + polymer housing | High | 100°C | $$$ | Washer extractors, moderate chemicals |
| Full AISI 440C (insert + housing) | Very high | 120°C | $$$$ | Continuous wet, bleach, caustic |
| Ceramic coated 440C | Extreme | 150°C | $$$$$ | Peracetic acid, high chlorine |
My advice: If you are a bearing distributor selling to laundries, stock both mid-range (epoxy + zinc) and high-end (full stainless). Your customers will need different levels. And always ask them what chemicals they use. That changes everything.
How to Choose the Right Seal for a High Humidity, High Temperature Laundry Environment?
You pick a bearing with a rubber seal. Water still gets inside. Maybe the seal cannot handle the heat and steam.
For high humidity and high temperature, choose a triple-lip contact seal with a stainless steel slinger. The slinger throws water away from the seal. Also use FKM (fluoro rubber) seals, not standard NBR rubber, because FKM resists heat and chemicals better.
Let me explain seal types and how to match them to your laundry machine.
I have tested seals in our lab. We put bearings in a steam chamber. We run them hot. We spray them with water. Some seals hold up. Others fail in hours. Here is what I learned.
Seal material: NBR vs FKM vs silicone
The rubber compound matters a lot. Standard NBR (nitrile butadiene rubber) works fine for dry, room-temperature bearings. But in a laundry, NBR hardens at 100°C. It also swells when it contacts some detergents. So it loses its tight fit. FKM (fluoro rubber, also called Viton) is much better. It stays flexible up to 200°C. It resists most chemicals. The only downside is cost – FKM seals cost about twice as much. But for a laundry bearing, I always recommend FKM. Silicone rubber is also an option. It handles high heat very well. But silicone has low tear strength. It can rip easily. So I prefer FKM.
Seal design: single lip vs double lip vs triple lip
A single lip seal has one rubber lip touching the inner ring. It works for dry dust but not for water. A double lip seal has two lips. It stops most water. But steam can still get through. A triple lip seal has three lips. They create a tight barrier. Very little water or steam gets past. For laundry machines, triple lip is the minimum. Some bearings also add a felt seal on the outside. The felt absorbs water and stops it before it reaches the rubber. That is even better.
The slinger: your best defense
A slinger is a metal or rubber disc. It sits on the shaft right next to the seal. The slinger spins with the shaft. Any water that splashes onto the slinger gets thrown outward by centrifugal force. It never reaches the seal. This is the single best feature for a wet environment. I strongly recommend bearings with a stainless steel slinger for washer extractors. The slinger also keeps out detergent foam. We use this design on our FYTZ laundry series bearings.
Housing seal groove design
Even the best seal will leak if the housing groove is wrong. The groove must be smooth and the right depth. A rough groove tears the seal. A too-deep groove lets the seal move around. At our factory, we machine the seal grooves with a special finish. We also add a small drain hole at the bottom of the housing. That drain lets any water that gets past the slinger run out. It does not pool inside.
Here is a seal selection guide for laundry equipment.
| Machine type | Seal material | Seal design | Slinger | Housing drain |
|---|---|---|---|---|
| Dryer (low moisture) | NBR | Double lip | Optional | No |
| Washer extractor (high water) | FKM | Triple lip | Required (stainless) | Yes |
| Ironer (high heat, steam) | FKM | Triple lip + felt | Required | Yes |
| Fabric folder (low moisture) | NBR | Double lip | No | No |
One more tip. Do not use a metal shield (ZZ type) in a laundry. Metal shields have gaps. Water goes right through. Always use rubber contact seals. And if you see water inside the bearing during inspection, change the seal immediately. Do not wait.
What Is the Correct Re greasing Schedule for Pillow Blocks in Fabric Processing Equipment?
You add grease every week. The bearing still gets dry. Or you add too much and the seals blow out. What is the right schedule?
For fabric processing equipment, re-grease every 500 to 1000 operating hours for standard grease, or every 2000 hours if you use high-quality polyurea grease. Use a small amount – 2 to 3 pumps for a UCP206 bearing – and always purge old grease through a relief port if available.
Let me give you a practical schedule based on real laundry conditions.
I have worked with maintenance teams in Pakistan and Egypt. They run large laundry lines. They told me that re-greasing is the most confusing part. So let me simplify it.
Step 1: Choose your grease type first
Not all greases work in laundry heat and moisture. I recommend one of these three:
- Polyurea grease: Good for high temperatures (up to 160°C). It resists water washout. It also has long life. This is my top choice for dryer bearings.
- Aluminum complex grease: Excellent water resistance. It sticks to metal even when wet. Good for washer extractors.
- Lithium complex with EP additives: Cheaper option. Works for moderate conditions. But it breaks down faster in hot water.
Do not use ordinary lithium grease. It will melt and leak.
Step 2: Calculate the base schedule
For a typical washer extractor running 10 hours a day, 6 days a week:
- With standard lithium complex grease: re-grease every 2 weeks (about 120 operating hours).
- With polyurea or aluminum complex: re-grease every 4 to 6 weeks (250 to 350 operating hours).
For a dryer running at 80°C:
- With polyurea: re-grease every 3 months (about 800 hours).
- With lithium complex: re-grease every 1 month (250 hours).
These are starting points. You then adjust based on temperature and moisture.
Step 3: Use the temperature method to fine-tune
Take the housing temperature with an infrared gun. Write it down. If the temperature goes up by 10°C from your baseline, you need more grease. If you see grease leaking from the seal, you are using too much. The ideal is a stable temperature and no visible leakage.
Step 4: How much to add
For a UCP205 to UCP208 size (25mm to 40mm shaft), add 2 to 3 pumps from a standard hand grease gun. For larger sizes (UCP210 to UCP212), add 4 to 5 pumps. Then run the machine for 10 minutes. Check the seal area. If no grease comes out, you can add one more pump next time. If grease oozes out, you added too much. Back off next time.
Step 5: Clean before re-greasing
This is often forgotten. Wipe the grease fitting (nipple) with a clean rag before you attach the gun. Dirt on the fitting goes straight into the bearing. That dirt will grind the raceways. Also, if the machine has been idle for more than a week, spin the shaft by hand a few times before adding grease. This distributes the old grease.
Here is a sample re-greasing log for a laundry.
| Machine | Bearing location | Grease type | Interval | Pumps | Temp before (°C) | Temp after (°C) |
|---|---|---|---|---|---|---|
| Washer extractor | Drum support (rear) | Alum complex | 4 weeks | 3 | 65 | 68 |
| Dryer | Idler pulley | Polyurea | 8 weeks | 2 | 72 | 74 |
| Ironer | Main roller | Polyurea | 6 weeks | 4 | 85 | 88 |
One final warning. Do not use a high-pressure air grease gun. The pressure can blow out the seal instantly. Use a manual gun. And if your bearing has a grease relief port (a second nipple or a small screw), open it before re-greasing. Let the old grease push out. Close it after you see fresh grease. That keeps the housing from over-pressurizing.
Conclusion
Choose stainless steel or coated bearings, triple-lip FKM seals, and a strict re-greasing schedule. Your laundry machines will run longer with fewer stops.