
I still remember a procurement manager from India who called me in a panic. He had received a big order for conveyor systems, but his bearing list was incomplete. The project got delayed, and he lost money. This happens more often than you think. But you can avoid this mistake.
To build a complete pillow block bearing list for RFQs and tenders, you need to clearly define the bearing size, mounting style, application rules, and visual identification. Start by measuring the shaft diameter, then choose the right housing type. Add details like bolt size and center height. Always include the load rating and any special requirements like seals or lubrication.
When you prepare a tender, every missing detail can cost you time and money. I have helped many buyers from Turkey, Brazil, and India create accurate lists. Let me walk you through the four key questions you must answer. This way you can build a list that leaves no room for doubt.
How to determine pillow block bearing size1?
Many engineers think size is just the shaft diameter2. But I have seen orders fail because they ignored the housing dimensions. A wrong size means the bearing does not fit the machine frame. This stops production.
You determine pillow block bearing size by measuring the shaft diameter, the housing center height3, and the bolt hole spacing4. You also need to know the bearing’s width and the dynamic load rating5. Always check if the bearing series is metric or inch, because mixing them leads to problems.
Breaking down the size parameters
When I talk to procurement managers like Rajesh, I tell them that a bearing size is more than a number. It is a set of measurements that must match the machine design. Let me explain each one.
Shaft diameter is the most obvious. But I always remind people to measure the shaft where the bearing sits. Do not assume the shaft is perfectly round. Sometimes it wears down. Use a caliper and take three readings at different spots.
Center height is the distance from the base of the housing to the center of the shaft. This matters because the shaft must line up with other components. If the center height is off, the whole machine vibrates. I remember a client in Egypt who ordered bearings with the right shaft size but wrong center height. He had to shim the base, which caused misalignment and early failure.
Bolt hole spacing and bolt size are critical for mounting. Different series have different patterns. For example, a UCP205 bearing has a different bolt spacing than a UCP206. If your machine frame has pre-drilled holes, you must match them exactly. I suggest you always measure the distance between the centers of the two bolt holes. Also check the bolt diameter. Some housings use metric bolts, others use inch bolts.
Bearing width affects how much space you need on the shaft. If the bearing is too wide, it may hit other parts. If it is too narrow, it may not support the load.
Load rating is often forgotten in RFQs. But it is essential. The dynamic load rating (C) tells you how much load the bearing can handle while rotating. The static load rating (C0) is for non-moving loads. I always include these numbers in my lists, especially for heavy industrial applications.
Here is a simple table I use to compare common series:
| Series | Shaft Diameter (mm) | Center Height (mm) | Bolt Hole Spacing (mm) | Bolt Size (mm) | Typical Application |
|---|---|---|---|---|---|
| UCP201 | 12 | 30.2 | 121 | 10 | Light conveyors |
| UCP205 | 25 | 36.5 | 140 | 12 | General machinery |
| UCP208 | 40 | 49.2 | 171 | 16 | Agricultural equipment |
| UCP210 | 50 | 57.2 | 184 | 16 | Heavy conveyors |
When you build your list, use a table like this. It helps everyone understand exactly what you need. I also recommend you add a note about the precision class. For most applications, P0 is enough. But for high-speed machines, you may need P5 or P6.
How to set a pillow block bearing1?
I once visited a factory in Vietnam. They had just installed new bearings, but the shafts were already noisy. I asked how they set them. They said they just tightened the bolts and hoped for the best. That is a recipe for failure.
To set a pillow block bearing, first clean the shaft and housing2. Slide the bearing onto the shaft and align it with the mounting holes. Tighten the housing bolts evenly, but do not fully torque them yet. Then lock the bearing to the shaft using the setscrew or adapter sleeve. Finally, torque all bolts to the specified value and check shaft rotation3.
Step-by-step installation guide
Setting a pillow block bearing seems simple, but small mistakes cause big problems. Over the years, I have developed a checklist that I share with my customers. Let me walk you through it.
Step 1: Prepare the shaft and housing surface.
Look for burrs, rust, or dirt. I use fine emery cloth to clean the shaft. If the shaft is damaged, it will ruin the bearing. Also check the mounting surface. It must be flat and clean. If it is uneven, the housing will twist when you tighten the bolts.
Step 2: Slide the bearing onto the shaft.
Do not force it. If it is tight, check the shaft again. Some bearings have a tight fit. You can warm the bearing slightly, but never use a flame. I use an induction heater or an oil bath.
Step 3: Align the bearing with the mounting holes.
This is where many people rush. They bolt one side first and then struggle with the other. I always place both bolts loosely, then shift the bearing until it sits naturally. If you have to pull or push the housing to align the holes, something is wrong.
Step 4: Tighten the housing bolts evenly.
Use a crisscross pattern. Tighten a little on one bolt, then move to the other. This prevents the housing from tilting. At this stage, do not apply full torque. Leave them snug but loose enough to allow minor movement.
Step 5: Lock the bearing to the shaft.
The method depends on the bearing type. For setscrew bearings4, locate the setscrew over the shaft flat spot (if any). Tighten the setscrew with an Allen wrench. For adapter sleeve bearings, tighten the locknut and then bend the tab into the slot. I always check the manufacturer’s torque recommendation. Over-tightening can damage the bearing.
Step 6: Final torque on housing bolts.
Now go back and torque the housing bolts to the specified value. Use a torque wrench. I have seen people use a regular wrench and guess the torque. That leads to loose bolts or cracked housings.
Step 7: Check shaft rotation.
Spin the shaft by hand. It should turn smoothly with no noise. If you feel roughness, something is wrong. Maybe the bearing is too tight, or the shaft is bent.
Here is a table of common torque values for setscrews5:
| Shaft Diameter (mm) | Setscrew Size (mm) | Torque (Nm) |
|---|---|---|
| 20 | M6 | 5-7 |
| 25 | M8 | 10-12 |
| 30 | M8 | 12-15 |
| 40 | M10 | 20-25 |
Always remember that a well-set bearing runs cooler and lasts longer. I always tell my clients: take your time during installation. It pays off.
What is the 2 2 1 pillow rule1?
I first heard this rule from a senior engineer in Russia. He used it to quickly estimate bearing spacing on long shafts. Many young engineers ask me about it because they see it in old textbooks. But few people explain it clearly.
The 2 2 1 pillow rule is a rough guideline for bearing placement2 on a shaft. It says: if the shaft diameter3 is 2 inches, the distance between two bearings should not exceed 2 feet, and the safety factor is 1. In metric terms, if the shaft is 50 mm, the maximum span is about 600 mm, assuming normal loads.
Understanding the rule with real examples
The 2 2 1 rule is not a scientific formula. It is a rule of thumb that comes from years of field experience. Let me break it down for you.
The first ‘2’ stands for the shaft diameter in inches.
In many older industrial countries, inch measurements were common. So a 2-inch shaft was a typical size for moderate loads. The rule assumes that if you have a 2-inch shaft, you can safely support it with bearings spaced up to 2 feet apart.
The second ‘2’ stands for the bearing span in feet.
2 feet is about 600 mm. This is the maximum distance between two bearings before the shaft starts to sag or vibrate. Of course, this depends on the load. If the load is light, you can go longer. If it is heavy, you need shorter spans.
The ‘1’ stands for a safety factor of 14.
In engineering, a safety factor of 1 means no extra margin. The rule assumes ideal conditions: a straight shaft, balanced load, and perfect alignment. In real life, you usually add a safety factor of 1.5 or 2. So you might reduce the span to 1.5 feet or 1 foot.
But how do you apply this rule today? Most machines use metric shafts. So I convert it. For a 50 mm shaft (roughly 2 inches), the maximum span is 600 mm. But if your shaft is 100 mm, you cannot just double the span to 1200 mm. The rule is only for the 2-inch baseline. For other sizes, you need to do a proper deflection calculation5.
Let me give you a real example. A customer in Indonesia was building a long conveyor. He wanted to use one bearing every 2 meters. I told him that for his 60 mm shaft, the span was too long. We calculated the deflection and found it would be excessive. So we added intermediate bearings6 every 1.2 meters.
Here is a simple table I use for quick estimates:
| Shaft Diameter (mm) | Recommended Max Span (mm) | Condition |
|---|---|---|
| 20 | 300 | Light load |
| 30 | 400 | Light to medium |
| 40 | 500 | Medium load |
| 50 | 600 | Medium load |
| 60 | 700 | Medium to heavy |
| 80 | 800 | Heavy load |
These numbers are just starting points. Always verify with calculations. I also remind people that the rule does not account for overhung loads. If you have a pulley or sprocket at the end of the shaft, you need a bearing closer to the load.
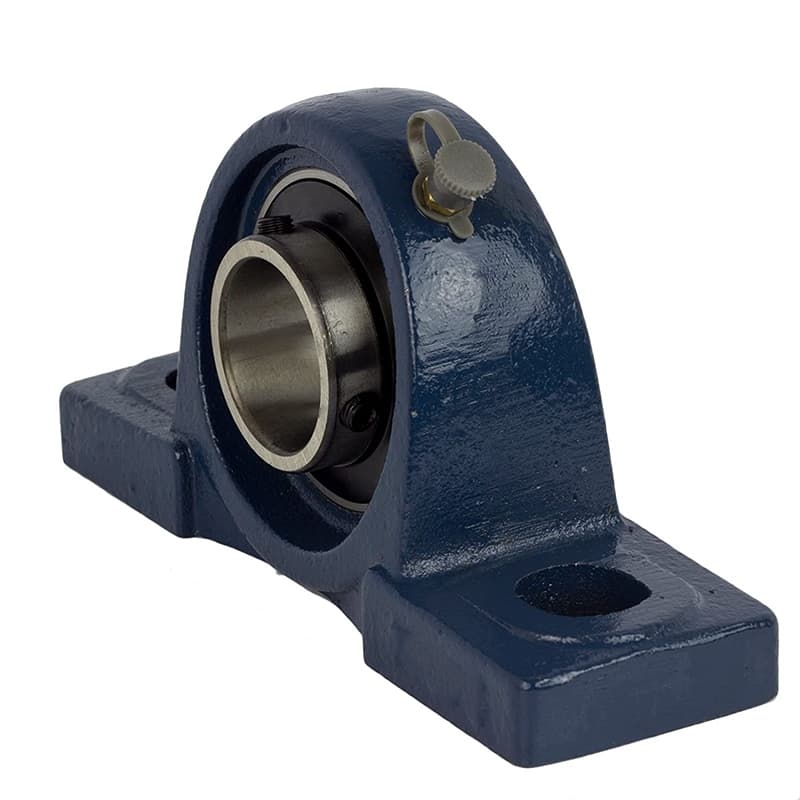
What does a pillow block bearing1 look like?
Sometimes a customer sends me a photo and asks, "Do you have this?" But the photo is blurry, and I cannot tell the type. I have learned to ask specific questions about the appearance. You should too, because ordering the wrong type means it will not fit.
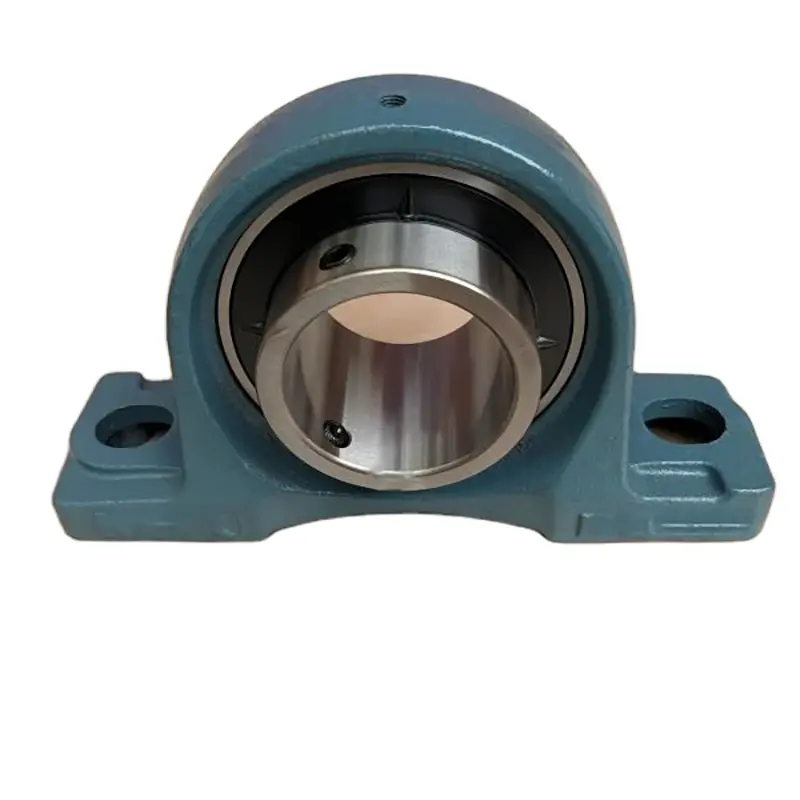
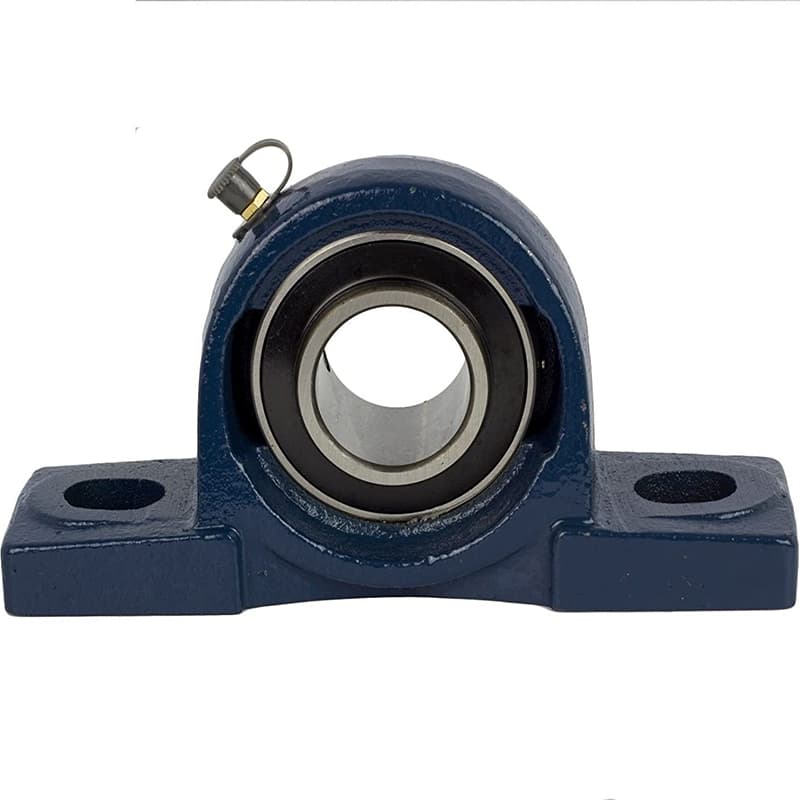
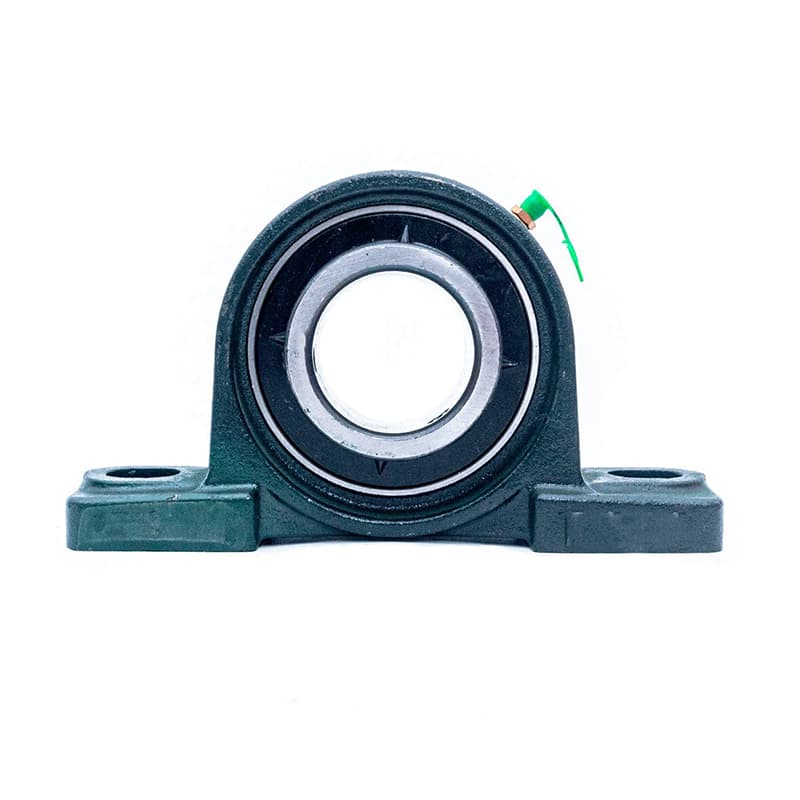
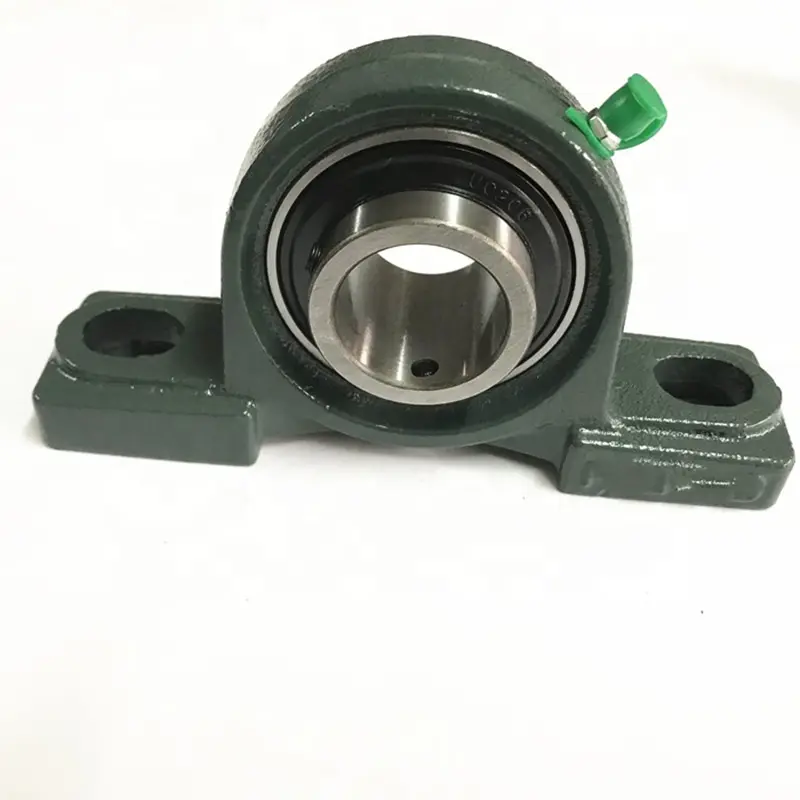
A pillow block bearing looks like a block with a round hole in the middle. It has a flat base with two bolt holes. Inside the hole, you can see the bearing insert, usually with a setscrew or a locking collar. The housing is often made of cast iron and may have a grease fitting2 on top.
Identifying different types by sight
When I look at a pillow block bearing, I check a few key features. They tell me what series it is and how it mounts.
Housing shape. The most common is the standard pillow block, also called a plummer block. It has a flat base and two ears with bolt holes. But there are also flange mounts, which have a square or round flange with holes around the edge. Then there are take-up units, which are used in conveyor tensioning systems. They look like a frame with a sliding bearing.
Bearing insert type. Look at the inner ring. Does it have a setscrew? That is common in UCP series. Does it have an eccentric locking collar? That is typical in UCFL series. Does it have a tapered bore for an adapter sleeve? That is often in heavy-duty series like UK.
Seals. I always check the seals3. Some bearings have rubber seals (2RS) on both sides. Others have metal shields (ZZ). Rubber seals keep out dust better. Metal shields handle higher speeds. If I see a bearing with a metal shield and dust around it, I know it might fail soon.
Material. Most housings are gray cast iron. But for food applications, they might be stainless steel or polymer. I can usually tell by the color and texture. Stainless steel is shinier and smoother.
Grease fitting. Look on top of the housing. Is there a small nipple? That is a grease fitting. Some bearings have it on the side. If there is no fitting, the bearing may be sealed for life.
Here is a table to help you identify common types:
| Type | Housing Shape | Locking Method | Typical Series | Common Use |
|---|---|---|---|---|
| Pillow Block | Flat base, two ears | Setscrew or eccentric collar | UCP, UKP | General shaft support |
| Flange Block | Square or round flange | Setscrew or eccentric collar | UCF, UCFL | Mounting on vertical surfaces |
| Take-Up Unit | Frame with slide | Setscrew | UCT, TAK | Conveyor tensioning |
| Cartridge Unit | Cylindrical housing | Setscrew | UCC | Limited space applications |
When you describe a pillow block bearing in an RFQ, use these visual clues. Say "UCP205 with cast iron housing and rubber seals." That leaves no doubt. I always tell my customers: a picture helps, but a clear description is better.
Conclusion
Building a complete pillow block bearing list means answering four questions: size, setting, rules, and appearance. Focus on these, and your RFQs and tenders will be clear and accurate.
-
Explore this link to understand the functionality and applications of pillow block bearings in various industries. ↩ ↩ ↩ ↩
-
Discover the significance of grease fittings in maintaining bearing performance and longevity. ↩ ↩ ↩ ↩
-
Understand the differences between rubber seals and metal shields to select the best option for your application. ↩ ↩ ↩ ↩
-
Learn about safety factors in engineering to understand how they impact design and safety in mechanical systems. ↩ ↩ ↩
-
This link will guide you through deflection calculations, helping you ensure structural integrity in your engineering projects. ↩ ↩ ↩
-
Find out when and why to use intermediate bearings, a key consideration for maintaining stability in long shafts. ↩